Long-term forex trading is popular among traders who want to hold on to trading positions for an extended period. They help traders deal with the competitive nature of the forex market by allowing traders to analyze the market and execute trades confidently.
In addition, they help to create a defined system with sound risk management techniques. This explains why experienced forex traders favor supply and demand trading.
For a market as complex as the forex market, countless strategies can be used, and trying to pick one out of a multitude of options can be overwhelming.
Using a supply and demand trading strategy creates a good foundation to incorporate other trading techniques while gaining an in-depth understanding of price. But before you get into supply and demand trading, it is important to understand how it works and what makes it the best option for you.
Understanding Supply and Demand Trading

The concept of supply and demand are the determinants of price. It is the force behind price fluctuations in the forex market and any security or tradable asset. In fact, price action traders tend to also focus on supply and demand trading, and there is a good reason for that.
Traders that understand the mechanics of demand and supply are better positioned to exploit current and future price movements in the forex market.
The basic principle of supply and demand in forex trading states that when there is high demand for a currency pair, the price of such an asset will rise, resulting in more buyers than sellers. However, where the supply of a currency pair is high, sellers dominate the market, resulting in the asset’s price falling.
The supply and demand trading strategy uses the most basic principles of the forex market and is a straightforward method for people new to trading. This strategy aims to highlight the zones or areas where the trader can make the most profit. These zones are formed when the asset’s price finds an equilibrium. At some point, even in trending markets, there is a period of the relative balance between buyers and sellers which creates the zones.
There are two zones: the supply zone and the demand zone. The supple zone is also called the distribution zone, while the demand zone is known as the accumulation zone.
Importance of the zones in forex trading
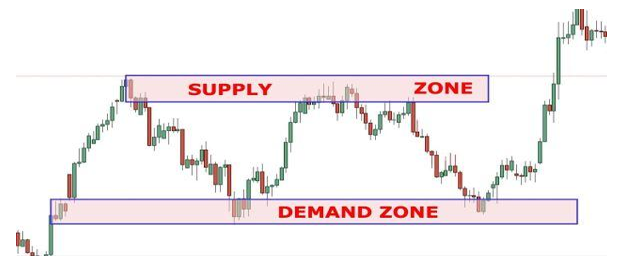
The supply and demand zones are key areas where the price has reached many times. Unlike support and resistance levels that resemble lines, these are much closer to zones hence the name.
When the price of a currency pair reaches the supply or distribution zone, traders attempt to sell the asset. This zone has a lot of sharp price movement because of the increased selling interest.
The demand zone is the opposite. Here, the price begins to drop due to the action of buyers. As the price begins to drop, most traders will wait until it reaches a point in the demand zone where they can profit most by buying.
These zones are so important because of the information and opportunities they provide traders. Traders can determine the forces behind currency rates. They can notice when major players like hedge funds, governments, and institutional investors enter the market to keep the price at a certain level or otherwise. Once you can understand and interpret the zones correctly, you can predict when the price may pause or retrace. In addition, you can combine this strategy with other major forex trading strategies to spot key zones and trade the currency pair for a profit.
How to Use the Supply and Demand Zones
Before you set your entry and exit points, stop loss, and take profit targets, you need to:
● Define the supply and demand zones
You can define the supply and demand zones by identifying points where the prices are higher or lower than the bid price. If there is an area where the price seems to rise or fall multiple times, then it is a supply or demand zone, as the case may be. Plus, look for areas where the price is ranging or consolidating because that may show a balance between supply and demand.
To confirm these zones, use daily or weekly pivot points depending on your trading time frame. Plus, you can use support and resistance levels to determine these zones. Look out for support and resistance levels that line up with possible supply and demand zones because it highlights the most profitable opportunities.
You can also use Fibonacci levels for better accuracy on the turning price points at the zones. Generally, the 61.8% Fibonacci level is the most significant Fibonacci level when using supply and demand zones. Technical indicators like the Relative Strength Index can provide extra confirmation of a supply or demand zone. If a potential price reversal aligns with a demand or supply zone, then it provides a reliable entry or exit signal.
● Examine the strength of the zone
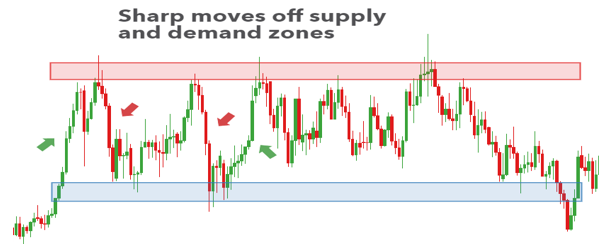
The strength of a supply or demand zone is determined by the price action within it. A good zone is narrow, and the price should spend only a little bit of time within the zone. In other words, the less time the price spends in the zone, the stronger it is. If the price spends much time within the supply zone, it is weak. Also, the farther the price moves away from the zone before returning to it, the higher the risk-to-reward ratio.
You can always use a volume indicator to analyze the strength of the zones. By examining the trading volume of the asset at different price levels, you can point out areas where high buying or selling pressure exists and take advantage of it.
● Trade the breakout
The supply and demand zones don’t last forever and will eventually break after it is tested multiple times. A strong imbalance between the buyers and sellers causes explosive price movement, and the stronger the breakout from the zone, the better it is. Every time the price revisits the zone, it weakens it.
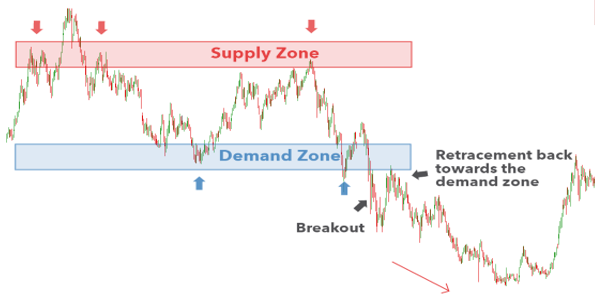
To trade the breakout, open a trade soon after the price breaks the supply or demand zone and moves beyond it. However, a retracement or pullback is still possible, and a stop-loss order should be placed close to either zone.
Demand and supply zones are quite similar to support and resistance lines, and the zones could indicate areas where traders can place stop-loss orders. If the price breaks the supply zone, then a stop-loss should be placed below the zone. But if the demand zone has been breached, stop-loss orders will be placed above the zone.
Setting take-profit targets after a breakout can be a bit complicated since the price is at a significant level. So, setting the take-profit after the highest or lowest level of a recent price swing is advisable.
Conclusion
Every strategy has its own set of benefits and downsides, even as price-oriented as the supply and demand trading strategy. If you are new in the market, trading with this straightforward long-term strategy allows you to understand the market with more than enough room to reflect on your performance.
When combined with chart patterns like the Adam and Eve pattern or one of the many harmonic patterns, it gives you a better overview of trends and price movements.
Whichever strategy you wish to use, make sure that you take your needs, experience, and unique situation into account. Also, different strategies work best for different markets. Some strategies are more effective in trending markets, while others may work best in ranging or more volatile markets. So, take time to understand the market you are working with and then choose the strategies that are best suited to it.