
DIY: Skip the Mechanic for Simple Car Tasks
By SJW
August 24, 2006 • Fact checked by Dumb Little Man

I gave it a shot and I changed my own brakes pads and discs. All in all, it was pretty darn easy and at the end of the process, I saved roughly $250.
Now I am Mr. Fix it and have spent a lot of time doing car maintenance myself. It's been a learning process but I've found some great resources to share.
Brake Pads: The Instructables site has an excellent tutorial that you can follow when it's time to change your brakes. As they say, unless you are totally strapped for money, upgrade to ceramic pads. This is something that I did not do and I hear a squeak when I brake. This prompted me to run to Sears Auto and they confirmed that it was simply because I chose to install cheap pads (but the install looked good!). Total Savings by DIY: $250.
Spark Plugs: I looked around for some solid DIY instructions and I found several, however, the ones at eHow were actually the best. I say this because they were the only instructions that boldly contained the warning that if not followed, will royally screw you. If you choose not to use these instructions, just know that changing plugs one at a time is critical. The wires are connected in a certain sequence. If you hook the plugs up to the wires in the wrong sequence, your car will either not start or will run like crap because it's missing a portion of the firing. Total Savings by DIY:$125 when compared to a quote from the car dealer.
Oil Changes: I can already hear you saying that Jiffy Lube is way more convenient and if so, you are not serious about saving money. I've found that for $11 and 30 minutes of time, you can get this done at home. Even more importantly, you can do it correctly. I will not go into detail about how Jiffy Lube once failed to properly thread my oil pan screw and how I slowly leaked oil for a week until the pan was dry. There are a ton of tutorials on this. Here are a couple to try: Popular Mechanics, Castrol Motor Oil (with Flash demo). Total Savings by DIY: Savings will vary, but you are looking at anywhere from $10-$50.
One of the many debates is the frequency of oil changes. I go with every 5,000 miles. Here is a great comment thread on Autoblog that will help you determine what your vehicle needs VS. what companies try to scare you with.
Check your alternator and battery: If you suspect that your car battery is not holding a charge (meaning that it didn't start up for you), DO NOT ask a mechanic to check your battery or alternator. You will most likely be charged $75.00 just for the test. Here is how to check your alternator yourself:
- Get the car running most likely by jumping it (jumping it DIY here).
- With the car running, remove the positive (that's the red) cable from your battery. Don't worry, you won't get shocked but don't be a goofball and touch the red while touching the black.
If your car dies by simply removing that red cable, your alternator is most likely bad. If it doesn't, your battery is bad. NOTE: Please read the comment thread of this post for information you should consider prior to trying this test. See, you just saved $75.00 by loosening a nut and another $200+ by not installing an alternator when you didn't need to.
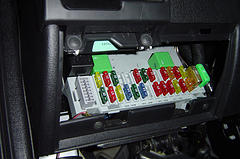
Random accessories not working: Maybe it's an interior light, your cigarette lighter, or your radio – doesn't matter. The first place to check is the fuse box. The fuse box is easily accessible and looks something like this. Common placement for a fuse box is under the steering wheel around where your knees are located while driving. If you cannot find it, use the index of your vehicle owner's manual (hmm, knew that would come in handy right?). An ExxonMobil service shop charged my ill-advised wife $20.00 for diagnosing a burned out fuse and replacing it. Guess what the fuse costs…$0.65. So, chalk this one up as a DIY $19.00+ savings!
Something is not right but I have no idea what it is: Most service stations offer a “Diagnostic Evaluation”. What this simply means is that they are going to plug their scanner into your vehicle's computer to determine what “p-code” is displayed. A p-code is how your car indicates where to look for the problem. I have seen these “Evaluations” cost $75.00 which is a total rip-off because the process literally takes 2 minutes.
There are 2 ways around this BS inflated charge:
- If you are in the US, go to Autozone. No this is not a commercial for them but they gladly do this for free and you don't have to get the vehicle serviced there. Here is a store locator.
- If there is no Autozone nearby, go to the service station and head to the shop, NOT the service desk. Yes, this amounts to a bribe but I've been able to consistently get a mechanic to perform this test by slipping him a $20.
Putting on your spare tire: This is a very crappy experience – you leave work and get a flat on the highway. You have 3 choices that don't include walking: call a tow-truck and get charged close to $100 for a tow, call your Auto club if you have one, or you guessed it – Do it Yourself. The first place you should look is obviously your owner's manual. If you are like me, you have an old car without one so it's really a DIY. Here are a few how-to sites to review: Pep Boys, BBC. Hey, I have an idea. Why not print one of these tutorials and stick it in the glove box? Getting a flat and saving $100 is better that getting a flat and paying the bill!
As I try out more money-saving car maintenance I will be sure to pass along more tips. If you have some DIY car tips, pass them on!

