


If you have a computer, you’ve most likely had to fix it at one point or another, and you may have had to find out how to recover files from a damaged Mac hard drive. It’s essential that you know a few ways to go about this because you don’t want to lose all of your valuable data if the unthinkable happens and your Mac dies.
We’re going to go over three ways to recover your data from a damaged storage drive on Mac. This way, you can do it yourself if this should happen to you. You won’t have to worry about going to a Mac repair shop and paying someone else to do it for you.
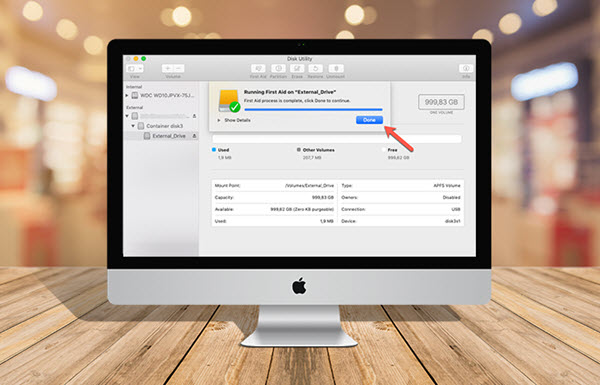
1. Repair the Failed Mac Hard Disk or SSD
If you’re one of the lucky ones, you’ll be able to repair your hard disk or SSD yourself and get your files. You have to get to Disk Utility to start the process and retrieve your files.
You can click Command and Space to trigger your Spotlight Search option and type in Disk Utility to bring it up. You can also find it by opening up your Apps folder first, and then you open your Utility folder. Once you’re in the folder, click on the disk that you’re having problems with and run First Aid.
It’ll check the drive for errors, repair them, and recheck if it deems it necessary. Also, First Aid will lock your Boot Volume on a temporary basis. This means nothing will respond, but it usually only takes a few minutes. If this fixes your problem, you should be able to get to your files. You should consider backing up your Mac to this point, so you don’t have to worry about it failing again.
If this step doesn’t fix your error, you can move on to part two.
2. Restart your Mac in Recovery
As cliche as it sounds, switching your Mac on and off again can have a positive impact on your system. However, struggling disks may not survive the on and off process, and your computer may refuse to reboot at all. Still, you should be able to accomplish this if your problem isn’t too dire.
You’re going to boot up your Mac in Recovery HD. This is actually where a partition on your drive is that’ll allow you to boot from the macOS. Also, it doesn’t do anything to your computer’s main drive. This means you don’t have to worry about accidentally overwriting anything.
To start, switch your computer off. Turn it back on and hold down the Command and R keys while it boots up. You want to hold these two keys down simultaneously until you see a spinning globe or the Apple logo. Once you enter Recovery Mode, you can enter your Disk Utility and go through the steps we outlined in step one.

You also want to avoid using this drive if you’ve lost data because anything that writes more files to the drive will overwrite anything you lost. This makes it impossible for you to recover them once this happens.
3. Use A Good Mac Data Recovery Software
Mac Data recovery software is a great choice to try and retrieve your files if your computer is going downhill. They usually get you back into your device. You can do this by using Stellar Data Recovery Professional for Mac. It’s free to try, very easy to use, and we’ll walk you through a step by step process below.
The nice thing about this recovery software is that it automatically switches to Advanced Recovery if your device’s hard drive, volume, or SSD has severe damage. This mode works specifically to recover your files, and it does so by using a file- signature search algorithm.
a. Once the program opens, toggle your buttons to switch it on or off. This helps you customize your data recovery, and it’s just a simple click of a button to choose to recover emails, documents, audio, videos, and photos. Pick which drive you want to scan, double check your settings, and set Deep Scan.

b. It’ll start to automatically scan your selected file once you press the scan button. Let it run all of the ways through. Once it runs, you’ll be able to look at which files the software was able to recover from your damaged drive.
c. You can now transfer these files from your damaged drive over to your external drive to save them again.

It’s important to note that you can only view your files with the free trial version of this recovery software. If you want to be able to transfer your files, you’ll have to activate the software. But, it’s nice to see what you can recover before you decide to purchase it or not.
If you do decide to purchase, the Stellar Data Recovery Professional for Mac will help you recover your deleted, inaccessible or lost data. It also offers disk monitoring features. If you need to repair videos and photos that have gone corrupt, in the meantime, you’ll need the Stellar Data Recovery Premium for Mac. Both can be run on 1 Mac device so if you are running a small business, you might need the Stellar Data Recovery Technician for Mac which runs on 3 Mac systems.
Bottom Line
Now you know how to recover files from a damaged Mac hard drive, and you can progress through the three different steps we outlined to see which one works for you. You’ll be able to recover your files and save them on a new drive quickly and easily.